Your car’s braking system is a masterpiece of redundancy. If you’re old enough to remember when cars had only one brake line, you know the horror story of a single leak leaving you with nothing but momentum and regret. Modern vehicles don’t gamble with safety like that. They split the hydraulic pressure into two independent circuits. Usually, that’s diagonal—front-left and rear-right on one side, front-right and rear-left on the other.
Why diagonal? Because if a hose bursts on one circuit, you still have two wheels braking. You’re not stuck with just the rear wheels, which can cause a spin-out, or just the front, which kills your steering control. You stop. You stay in the lane. You go home.
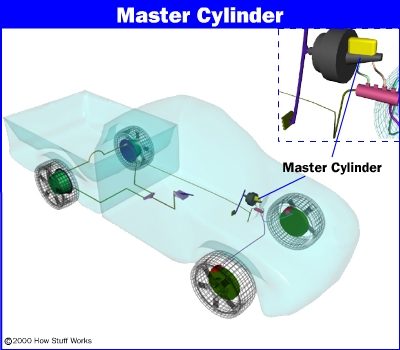
At the heart of this dual-circuit safety net sits the master cylinder. It is the powerhouse. It doesn’t just push fluid; it manages pressure for two separate circuits using two pistons inside a single housing. It’s a failsafe design in the truest sense. Even if the internal seal on one piston fails, the second piston keeps working. You might have to press the pedal to the floor, and the pedal feel will be mushy, but the car will still stop.
But the master cylinder isn’t working alone. It’s joined by the combination valve, a small but mighty component that acts as the system’s immune response. This valve monitors pressure differentials between the front and rear circuits. If it detects a leak in one circuit, it warns you. It also helps balance braking force so the rear wheels don’t lock up before the fronts.
We’re going to tear into how these two components actually function. If you need a refresher on drum versus disc brakes, or how friction stops a two-ton machine, start there. Once you’re back, we’ll look at the master cylinder’s anatomy.
The Master Cylinder
Where exactly is this critical component hiding?
Where is the master cylinder actually hiding?
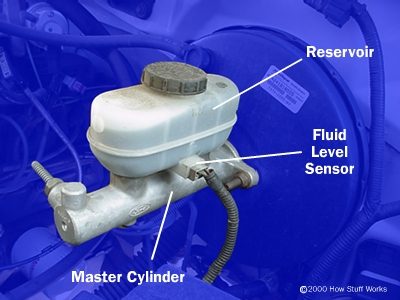
Look at that plastic jug. It’s not just decorative filler. That is the brake-fluid reservoir and it serves as the master cylinder’s primary source of hydraulic fluid. If you are trying to locate the master cylinder location in your specific vehicle, start here. Most modern cars tuck this assembly behind the firewall, directly on the driver’s side of the brake booster.
The tank has a job beyond just holding liquid. You will see an electrical connector plugged into its side. That is a sensor designed to trigger a warning light on your dashboard. It monitors the fluid level and alerts you when the brake fluid gets low. This isn’t a minor maintenance reminder. It is a safety critical signal.
Low fluid usually means two things. Either you have a leak somewhere in the brake lines or calipers. Or your brake pads are worn down to the metal, causing the caliper pistons to extend further. This pulls more fluid into the calipers to compensate. The reservoir level drops as the pads wear. The sensor catches this change.
Why the fluid level matters for braking
The master cylinder converts your foot pressure into hydraulic pressure. It pushes fluid through hard lines and flexible hoses to the wheels. If the reservoir runs dry, air enters the system. Air is compressible. Brake fluid is not.
Air bubbles in the lines make the pedal feel spongy. They absorb the force you apply. This drastically increases stopping distance. In extreme cases, it can lead to total brake failure. That is why the low-fluid warning light is non-negotiable.
When you see that light, do not ignore it. Check the reservoir level first. Top it off with the correct DOT-specification fluid if needed. Then inspect the rest of the system for leaks. If the level was full and the light came on, look at your brake pads. Thin pads explain the drop.
Maintenance tips for the reservoir
Keep the cap tight. Moisture is the enemy of brake fluid. It absorbs water from the air over time. This lowers the boiling point of the fluid. During hard braking, the fluid can boil. Vapor bubbles form. You lose hydraulic pressure instantly.
Clean the area around the cap before opening it. Dirt falling into the reservoir is catastrophic. It can clog the small ports in the master cylinder valves. Use a rag. Wipe the top. Remove the cap slowly. Check the fluid level. It should be near the “Max” line.
If the fluid looks dark or cloudy, it is contaminated. Change it. Fresh fluid is clear and light amber. Old fluid is dark brown. It smells different too. Brake fluid degrades. It breaks down chemically. This causes corrosion inside the lines and calipers.
Checking for leaks
Inspect the lines connecting the master cylinder to the rest of the system. Look for wet spots. Brake fluid is slick. It leaves a residue. Check the wheel wells. Look at the calipers. Look at the proportioning valve.
A leak can happen at any connection. O-rings degrade. Metal lines rust. Rubber hoses crack. Any of these failures drops the fluid level. The sensor triggers the light. You find yourself on the side of the road with a dead brake pedal.
Prevent this by checking the reservoir regularly. Every oil change is a good time to look at the brake
Master Cylinder Mechanics and Failure Modes
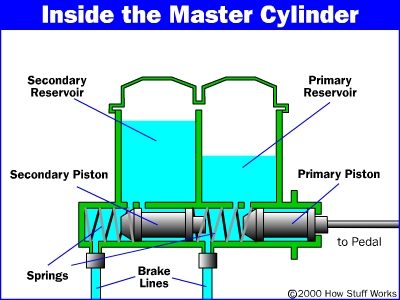
Peek inside a master cylinder and you are looking at a dual-chamber system. Two pistons. Two springs. The design is intentional. When you stomp on the brake pedal, a linkage pushes the primary piston. Pressure spikes in the main line and the brake fluid. As depression continues, that force bridges the gap to the secondary piston. It compresses fluid in its own circuit.
Ideally, pressure matches across both circuits. Equal force. Equal stopping power.
But what happens when the system fails?
A leak in one circuit is catastrophic for balance. The diagram shows the failure mode clearly. When the first circuit loses fluid, the pressure buffer between the primary and secondary cylinders vanishes. The primary piston slams into the secondary one.
The master cylinder essentially becomes a single-piston device.
The second circuit still works. It holds pressure. It has fluid. But the driver has to push the pedal nearly to the floor to engage it. You are left with brakes on only two wheels. Stopping distances skyrocket. The car becomes unpredictable.
The Combination Valve Role
You will spot a combination valve on most vehicles mixing front disc brakes with rear drum brakes. This component is not optional. It is necessary.
Disc brakes require less hydraulic pressure to clamp down than drum brakes. Without a valve to balance this disparity, the rears would lock up long before the fronts. The combination valve manages this pressure split. It ensures the rear drums do not overpower the front discs during moderate braking.
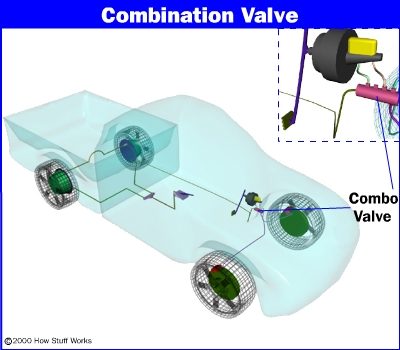
You won’t find this component sitting out in the open where you can just grab a wrench and swap it. It is tucked away, usually near the firewall or mounted directly to the brake lines running through the engine bay. If you are looking for the combination valve location, start by tracing the main brake line from the master cylinder. Most often, it is the first major junction you hit before the lines split to the front and rear axles.
The real reason this part earns its keep is its efficiency. It isn’t just one thing. It is a consolidation of three distinct hydraulic functions into a single aluminum block. This saves space, reduces potential leak points, and keeps the under-hood chaos manageable.
Why the Combination Valve Matters
When you hit the brakes, hydraulic pressure doesn’t distribute evenly. Front brakes do the heavy lifting because of weight transfer. Rear brakes would lock up instantly if they got the same pressure as the fronts. That is where the internal mechanics of this unit take over.
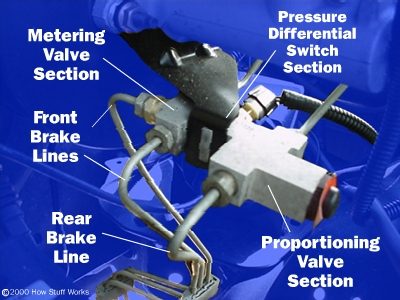
It combines the metering valve, pressure differential switch, and proportioning valve into one compact unit.
If you are diagnosing a brake issue, knowing what each sub-function does helps you narrow down the failure point without tearing the whole car apart.
The Metering Valve Function
Before the brakes even engage, there is a delay. The metering valve holds back pressure to the front brakes until the rear drum (or disc) brakes overcome their return spring tension. This ensures the rear brakes apply slightly before or at the exact same time as the fronts.
Without this delay, your rear wheels might grab a split-second too early on light braking. The result is a twitchy nose and a loss of steering control. The combination valve manages this timing so you don’t have to worry about it.
The Proportioning Valve Role
This is the big one. The proportioning valve kicks in once the system reaches a certain pressure threshold. It restricts the flow of hydraulic fluid to the rear brakes, preventing them from locking up during hard stops.
The relationship between front and rear brake pressure is critical. If the proportioning function fails, you will feel the rear end step out. You might not even realize it is the brake system until you are trying to correct a slide on a wet road. The valve modulates pressure dynamically, keeping the car straight.
The Pressure Differential Switch
Not all functions are hydraulic. One part of this unit is electrical. The pressure differential switch monitors the balance between the front and rear brake circuits.
If you lose pressure in one circuit—due to a leak or a line rupture—the switch detects the imbalance. It immediately triggers the red brake warning light on your dashboard. This is your first alert that something is wrong. Ignoring that light because it “might be a bulb” is a mistake. The switch is there to tell you the hydraulic integrity is compromised.
Where Exactly Is It?
The exact combination valve location varies by manufacturer, but the geography is consistent enough to find with some patience.
- American Muscles: Often mounted on the driver’s side firewall, close to the master cylinder.
- European Imports: Sometimes integrated into the master cylinder body itself, meaning you replace the whole assembly.
- **
The Metering Valve Logic
You need a metering valve if your ride has disc brakes up front and drums in the back. It’s not just arbitrary hardware. Disc pads sit right against the rotor. Drum shoes hang away from the drum until pressure pushes them out. Push the pedal. Discs grab first. This throws off the balance.
The metering valve fixes that timing. It holds back pressure to the front discs. It won’t let a drop of fluid through until it hits a specific threshold pressure. That number is low. Low enough that the drum shoes finally extend and make contact. Just before the discs bite.
Why does this matter? Stability. Engaging the rear brakes first keeps the nose down. It stops the car from fishtailing during hard stops. Think of it like a rudder on a plane. Keeps you tracking straight. Without it, the front grabs while the rear is still catching up. Uncomfortable. Unsafe.
Pressure Differential Switch
This little switch is your early warning system for leaks. It lives inside the combination valve. Inside is a piston. Centered in a cylinder. One side sees circuit one pressure. The other side sees circuit two.
Same pressure? Piston stays put. No leak. But if a line bursts in one circuit? Pressure drops on that side. The piston shifts. Off-center. It closes an electrical switch. The red brake warning light on your dash flips on. You see the wires. You know something is wrong before you feel the pedal go to the floor.
Proportioning Valve and Weight Transfer
Discs are good. Drums are okay. But the proportioning valve is the real hero for preventing lockups. It reduces pressure to the rear brakes. Always.
Here is the physics of it. Brake force capacity depends on weight on the tire. More weight equals more grip. Slam the brakes. Weight transfers forward. The front dips. The rear lifts. Front tires get heavier. Rear tires get lighter. Most cars are nose-heavy to begin with because the engine sits there.
Equal pressure at all four wheels? Rear wheels lock up first. They don’t have the weight to support that much friction. You lose steering control. The proportioning valve steps in. It restricts flow to the rear. Front wheels get the full force. Rear wheels get a cut.
Say the valve is set to 70 percent efficiency. Front brake pressure hits 1,000 psi. Rear brakes only see 700 psi. That difference matters. It keeps the rear tires rolling while the fronts do the heavy lifting. If you had a pure hydraulic system without this valve, you’d be sliding sideways long before you stopped.
Why This Setup Matters
Modern ABS covers a lot of ground. But the mechanical basics remain. Discs and drums have different engagement characteristics. Weight transfer is unavoidable physics. You need valves to manage both.
Without the metering valve, front discs grab too early. Instability. Without the proportioning valve, rears lock up under heavy braking. Skidding. The combination valve packages both solutions into one compact unit. It’s simple engineering. It works because it respects the physical limits of your tires and suspension.
Related Resources
If you want to dig deeper into the hydraulic side:
- How Anti-Lock Brakes Work
- How Brakes Work
- How Disc Brakes Work
- How Drum Brakes Work
- How Power Brakes Work
For historical context and technical specs:
- Halting History: Brakes Then and Now
- InnerAuto: Braking System
- Automotive 101: Brake System Operation (check DOT fluid specs)
- Hydraulic Brakes
- Master Cylinder Drawings
- Rebuilding the Brake Master Cylinder
- Professional Mechanics Online: Brakes
- Auto.com: Daily automotive news and reviews