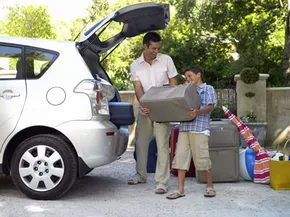
Modern parenting has turned compact sedans into awkward puzzles. You’ve got the stroller. The car seat. The diaper bag that somehow always weighs fifty pounds. Throw in a few suitcases for a weekend trip and suddenly, the backseat is a no-fly zone. The solution isn’t buying a new minivan. It’s moving the clutter outside.
Cargo carriers have evolved from simple wire baskets to robust, aerodynamic storage solutions. They let you haul mountain bikes, skis, or weeks’ worth of luggage without inflating your monthly payment. You don’t need a conversion van to carry your life. You just need to know where to put it.
The installation process varies wildly depending on the type of carrier you buy. Roof racks require precision. Hitch carriers demand structural integrity. Both are DIY-friendly if you follow the steps. Ignore the instructions, and you risk losing your gear—or your bumper—on the highway.
Roof-Mounted Cargo Carriers
Start with the roof. If you drive a station wagon or a crossover, this is your best bet. Roof racks add height and wind resistance, but they keep the cabin quiet.
Key considerations for roof carriers:
* Crossbars: Most cars come with side rails. You need crossbars to attach the carrier.
* Weight Limit: Check your owner’s manual. Most roofs support 150 to 175 pounds. Overload it, and you’ll bend the frame.
* Aerodynamics: Flat-bottomed carriers cut wind noise. Basket-style racks create a jet engine effect at 65 mph.
Installation steps:
1. Clear the roof. Remove any existing accessories.
2. Align the crossbars. Ensure they are level and spaced correctly.
3. Attach the feet. These clamp onto the roof rails. Tighten them evenly.
4. Lock it down. Use the provided keys. Vibration will loosen standard bolts over time.
“A roof rack is only as good as its mounting points. If the feet aren’t secure, your cargo becomes a projectile.”
Hitch-Mounted Cargo Carriers
Not all cars can handle roof loads. Or maybe you just hate climbing ladders. Hitch carriers slide into the receiver tube at the rear of your vehicle. They are easier to load. Lower center of gravity means better handling. But they block your license plate and taillights. You’ll need extension kits.
Types of hitch carriers:
* Platform carriers: Flat trays for bikes or cargo boxes.
* Basket carriers: Wire or plastic baskets for loose items.
* Fold-down models: Essential if you need rear access.
Installation steps:
1. Insert the shank. Slide the carrier’s metal tube into the hitch receiver.
2. Secure the pin. Use a pin clip or a lock. Anti-rattle devices reduce sway.
3. Check the angle. The carrier should sit level. Tilting it forward or back affects stability.
4. Test the load. Shake it. If it moves, tighten the hardware.
Choosing the Right Carrier
The best carrier depends on your vehicle and your habits. Do you camp every month? Get
You have two main options when your trunk hits capacity: strap it to the roof or sling it off the back. Both spots work, but they punish your driving experience differently. Roof carriers give you volume. You can haul kayaks, bikes, or enough camping gear to last a month. The trade-off? You lose aerodynamics. Wind noise creeps in. Fuel economy takes a hit. And good luck fitting that bulky box into a parking garage with a seven-foot clearance limit.
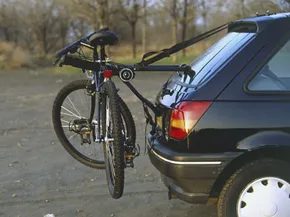
Rear-mounted carriers keep your center of gravity low and your drag coefficient manageable. They don’t ruin your gas mileage. But they do expose your cargo to the chaos of city driving. A fender-bender from behind means your stuff goes with it.
Decide your battlefield, then read the instructions. Seriously. Don’t skip the manufacturer’s manual.
The Roof-Top Approach
Start with the foundation. You need a roof rack. If you drive a modern SUV, wagon, or minivan, you might already have factory bars bolted on. If you drive a sedan or a newer model without rails, you’re looking at an aftermarket install.
Old school? You drill holes. New school? You clamp to the rain gutters. Those curved metal strips running along your window lines aren’t just for drainage. They’re structural anchors. But here’s the catch: every manufacturer shapes their gutters differently. You cannot buy a generic rack and pray it fits. You need a system engineered for your specific make, model, and year. Get the wrong one, and you’re scratching your paint or stripping your threads.
Once the rack is secure, look at the geometry. You need side rails running front-to-back and crossbars running left-to-right. This grid holds your cargo. You have three choices for what sits on that grid:
- Luggage Baskets: Open frames. Good for bulky, irregular items like skis or bikes.
- Cargo Boxes: Hard-shell, enclosed containers. Weatherproof. Secure. Aerodynamic.
- Cargo Bags: Soft-shell alternatives to boxes. Cheaper, but less durable.
The installation logic is simple. Slide the crossbars apart to match the width of your carrier. Most systems use a bracket-and-screw clamp mechanism. You don’t need tools for some; others need a hex key. Tighten it down. Check it again. Then check it a third time before a long highway trip. Vibration loosens things. A falling cargo box at 70 mph is a lawsuit waiting to happen.
The Rear-Mounted Alternative
Skip the roof? Go to the hitch. Almost every rear carrier relies on a trailer hitch. Many cars come with these pre-installed. If yours doesn’t, you need to add one. Stick to a standard 1-1/4-inch (3.175 cm) interchangeable hitch. It’s the sweet spot. It lets you swap between a tow ball for a trailer and a cargo carrier without buying new hardware.
The carriers themselves are straightforward. They slide into the receiver tube. A cargo tray works like an open luggage rack but mounted on the bumper. If your carrier needs a 2-inch hitch and your car only has 1-1/4-inch, don’t panic. Use an adapter. They’re cheap. They work.
But remember the vulnerability. That cargo is hanging off the back of your vehicle. It’s the first thing to hit if someone rear-ends you. It’s also visible to thieves. And it obscures your taillights and license plate unless you install a lighting kit.
Additional Parts Needed for Cargo Carriers
Before you hit the road, check your inventory. Do you have the right locks? Most carriers come with integrated keys, but they’re easy to steal if the whole unit is pried off. Consider secondary security measures.
What about weather? Even hard-shell boxes can leak if the seal degrades. Silicone spray for the gaskets? A good idea.
And don’t forget the accessories. Bungee cords for securing loose items inside the box. Bike mounts if the basket supports them. A step ladder if your roof carrier is mounted too high to reach comfortably.
The installation is only half the battle. Maintenance is the other. Inspect the clamps every time you fill up. Check the hitch pin for wear. Lubricate moving parts. A squeaky rack is worse than a silent one—it’s a warning.
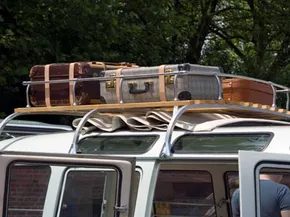
You’re ready to roll, but don’t just toss a mountain bike or a suitcase onto your roof basket and hope for the best. Gravity is a harsh mistress. Without proper securing, your weekend gear will likely end up somewhere on the interstate. The suitcase issue is low-tech but effective. You want a luggage net. These snap onto the rack, creating a mesh cage that keeps bulky bags from sliding off at highway speeds. Add an all-weather cover or a dedicated cargo bag. Rain, dust, and highway grit don’t care about your plans.
Securing Non-Standard Cargo
A standard basket won’t cut it for a bike, kayak, or snowboard. You need specialized racks. These are engineered to keep long items upright and stable against wind shear. Ski racks lock skis and boards in place. Some systems add a top bar that rests across your crossbars. The bike sits in this bar, held tight by fasteners. It’s rigid. It’s secure. If you’re using a rear-mounted carrier, check if it supports these same accessory mounts. Not all do.
Theft Prevention
Your cargo is a target. Thieves are opportunistic. Invest in locks for your carrier. Many cargo boxes come with built-in locking mechanisms. That’s a start. But you can upgrade. Aftermarket locks exist for everything from boxes to snowboard mounts. If you’re towing with a hitch carrier, lock the hitch itself. This stops thieves from taking your stuff and the carrier. Don’t leave your investment sitting in a parking lot with a simple strap.
Safety and Visibility
Roof boxes don’t block your brake lights. They’re high up. Rear-mounted carriers? They hang right in the blind spot of the car behind you. This is a genuine safety risk. If you’re using a rear carrier, you need a brake light kit. These lights mount to your box and sync with your pedal. Look under the rear of your car. You might find a dedicated plug. It’s often there. Most kits are plug-and-play. Some carriers now have lights built in. Check specs. If yours doesn’t, buy the kit. It’s cheaper than a fender bender.
The Bottom Line
With a solid install and the right accessories, you’re set. Your gear is secure. Your lights are visible. You have extra space. You can hit the road in comfort. More info on towing is on the next page.
Lots More Information
Related HowStuffWorks Articles
-
Is there a green way to tow?
-
10 Tips for Easy Towing
-
How Tongue Weight Works
-
How Snowboarding Works
-
How Brakes Work
More Great Links
-
Yakima
-
Thule Racks
-
Trailer Hitch Universe
Sources
-
“Frequently asked rack questions.” Rack Attack. http://www.rackattack.com/frequently-asked-rack-questions.asp
-
“Load Warrior.” Yakima. http://www.racknroad.com/upload/products/load.pdf
-
“Technical support and instructions for roof mount bike rack #64720.” Pro Line Racks. http://www.prolineracks.com/tech64720.html
-
“Thule Terrapin cargo box.” Auto Anything. http://www.autoanything.com/roof-racks/69A3098A0A0.aspx
-
“Time Travel series.” Thule Car Rack Systems. http://lib.store.yahoo.net/lib/orsracksdirect/thule-mountaineer-excursion-frontier-cargo-box-instruction-manual-pdf.pdf